Showing posts with label activities for kids. Show all posts

Monday, June 3, 2024

Father's Day Activities


A big thanks to Mrs. John B. Dodd, of Washington, for the idea of Father's Day first introduced it in 1909. Through the years it became more and more popular until finally in 1966, President Lyndon Johnson signed a presidential proclamation declaring the 3rd Sunday of June as Father's Day.
Each of us have our ideas of how Father's Day should be celebrated and in our society the cards and gifts will continue to help build those memories. But Dad deserves more than just one more striped tie-he needs the gift of time and/or something homemade. Let's appreciate all the things he brings to our lives by sharing these experiences and bonding with Dad on his special day.

SWEET CHILD OF MINE: (Baby and Toddler)
Early in a child's life, it's important that fathers get involved with daily care activities-feeding, dressing and changing diapers. Bonding is an important lifetime experience between a father and child.

Play this game anytime you dress your little one. Massage, kiss, cuddle and blow air on the child's body. Tell your youngster you love him/her. Daddy can recite the following poem as he dresses his bundle of joy on Father's Day.

DADDY LOVES YOU SO, SWEET CHILD OF MINE.
YOU ARE SO SOFT AND WARM TO HOLD.
I'LL WIGGLE YOUR NOSE AND TICKLE YOUR TOES,
THEN GO ROUND AND ROUND ON YOUR NICE LITTLE TUMMY.
NOW FOR A KISS, SWEET CHILD OF MINE.
YOU ARE A JOY TO LOVE AND CUDDLE.

PUT YOUR HAND IN MINE: (Preschool)
As you child gets a little older, comparing handprints is a lifelong lesson. Have your child place his/her hand on a sheet of paper and trace around it. Place your hand over the tracing of your child's hand and help your child trace around it. Ask your youngster to compare the sizes of the two sets of hands. Tell your child a story about something you liked to do when your hands were small. Let your child tell you what he/she would like to do when his or her hands are the size of yours. As an extended activity, take a walk together holding hands.

THINGS DAD AND THE KIDS CAN DO TOGETHER: (School Age)
Go to the local nursery together to buy a few plants. At home, spend fun time in the yard planting your new foliage. Continue gardening together as much as possible.

Go for an afternoon drive. See how many muscle (sports) cars you can identify together.
Set up the sprinkler in the yard and have fun splish-splashing through the water. Brings back Dad's childhood.

Have a "mini family reunion." Invite relatives over for an afternoon of food and games. Help Dad with the all time favorite BBQ.

Snuggle away a few hours together on the couch talking about your child's dreams, hobbies, etc. Today, read a story to Dad.

Most of all, tell Dad you love him. That will really make him smile!!!


I hope all the dads and father figures enjoy their special day on June 16th.
Until next time,
Tania


Photos courtesy of Tania Cowling, all rights reserved

Monday, March 25, 2024

Creative Crafts for Easter


Easter/Passover is on its way and the perfect time to craft with the kids. Do you need some ideas? I'm posting a culmination of some articles I wrote the past couple years. They are easy and mostly use materials found in the home. Enjoy your holiday and spring!

Happy Parenting,
Tania


Hatching Baby Chicks

Spring is the season for renewal of life and we often hear about baby chicks hatching from eggs. I would suggest getting a book from the library on hatching baby chicks so the children can understand the process.
You will need:
  • Egg halves (washed and dried)
  • 2 yellow pom-poms (one larger than the other)
  • Googly eyes
  • Orange construction paper
  • Safety scissors
  • Heavy-duty glue
Directions:
  1. Give each child one eggshell and two yellow pom-poms. Have them carefully glue their pom-poms inside the eggshell, one on top of the other. Make sure to have extra eggshells available as these are fragile and could crumble.
  2. Finish this craft by gluing on two eyes and an orange beak cut from construction paper.
  3. You can display these baby chicks inside an egg carton or staple a circular ring from heavy-duty paper to make an egg stand.


  • Crafting With Matzoh for Passover
    For Passover, let the children use broken pieces of matzoh and invite them to glue these pieces onto construction paper. Lots of very creative pictures emerge from this activity. Have them tell you about their design.

  • What’s more fun than painting matzoh? Eating it! Melt white chocolate chips in a bowl (a microwave can be used). Separate the melted chocolate into several bowls. Add drops of food coloring to make a variety of edible paints. Using a clean paintbrush or cotton swabs, invite your child to paint designs and pictures on a square of matzoh. Note: you may have to keep reheating the chocolate to keep it liquid for painting. Chocolate hardens very quickly. Another variation is to use pre-made frosting in tubes that can be purchased in grocery stores. When finished, share the artwork and then enjoy the snack.


  • The Hunts of the Season
    Celebrate Passover with a treasure hunt for the “Afikomen." The matzoh is placed in a holder and here is a simple one to make:
    You will need:
    • Two sheets royal blue felt (9" x 12")
    • Silver glitter glue, decorating decors
    • Tacky glue
    •  
  • Simply glue the two sheets of felt together around the edges, leaving one side open for a piece of matzoh. You could also sew them together if you wish. Draw six-sided stars with glitter glue. You can also add decors like lace, sequins, or faux jewels with the tacky glue. Let dry completely and you are ready to place this work of art on the Seder table.
    To hunt for the Afikomen, hide this piece of matzoh in the holder somewhere in the home. Present a few clues to lead the kids from the dining area to where the Afikomen is hidden. Whoever finds the matzoh wins a prize. 

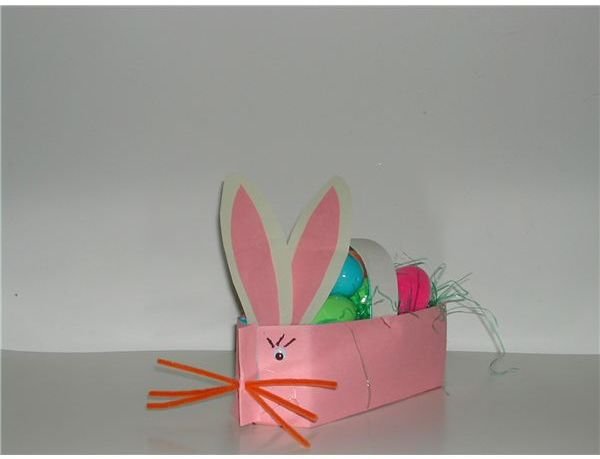
    For Easter, create this cute bunny basket for your youngster to collect his “finds of the hunt." Take a half-gallon milk carton and remove one panel using safety scissors or a craft knife (adult use only). Save this panel to make a handle. Cover all sides of this carton with construction paper using glue or tape. Cut a strip from the saved panel and staple it on both sides to make a handle. Create a cute bunny face by gluing on googly eyes, stapling on bunny ears made from heavy paper, and lastly whiskers. If you punch a hole in the center of the top ridge; pipe cleaners can be inserted equal distance and bent slightly for bunny whiskers.

  • Making homemade Easter crafts and Passover crafts for kids are milestones and memories that you and your children will never forget. Enjoy this creative time together and the fun holiday festivities to follow!
    Note: Use parental supervision and age appropriate art materials when making crafts with kids.

  • Some crafts were part of articles first published on Bright Hub Education by Tania K Cowling
  • Photos courtesy of Tania Cowling, all rights reserved


Friday, November 24, 2023

December Holiday Garland Craft


Children love the holidays and these crafts are adaptable to suit three different holidays. Surprise your group with a fun holiday craft this month. These crafts can be multicultural by just changing the colors. Be it red & green for Christmas, blue & white for Hanukkah, or red, green & black for Kwanzaa—adapt these crafts for your holiday!

Multicultural Children Garlands:

These garlands can be strung along a wall or across a doorway.  Use brown grocery bags that you have stored from shopping.  Dress the children cutouts in the colors of your holiday.

These are simple paper-doll instructions. Start by cutting a 5-by-4-inch strip from a grocery bag.  Next, fold the strip of paper, accordion-style, about four times.  On the top layer, draw a child shape. You can draw this freehand or trace around a child or gingerbread cookie cutter. The hands and feet you draw must extend out to the folded edges.  Cut through all layers of the paper, making sure not to cut where the arms touch the fold. Young children may need help with this task. The decorating is the fun.  Cut clothing from gift-wrap or construction paper.  Draw in shoes, hair, faces, and any extras with markers, puffy paints, or gel pens.  For texture you can glue on pom-poms, buttons, or pieces of fur.  Let your child’s imagination run wild.

Holiday Wreath:

Use your child's hands to make this holiday wreath. From a piece of cardboard, cut a 12-inch circle (a pizza box lid or carton works well).  Again cut another 3-inch circle in the center to complete the wreath. A craft knife is useful to make the cuts but only by an adult. Invite your child to paint the entire cardboard wreath with poster paint in the color of your holiday. After the paint dries, have the child make handprints on the wreath. Brush the child’s hand with a different color paint and press the hand down on the board. Continue to print handprints around the wreath in a circular fashion.

For another option, trace hands on complementary-colored stiff construction paper, cut out, decorate the hands if you wish, and glue them around the circle.

Make a bow from fabric, crepe paper, large ribbons or construction paper to decorate the bottom.  Make sure to write the date on the back of this memorable project.

Have fun with these two crafts.
Happy Parenting,
Tania  :)

Photo courtesy of Tania Cowling, all rights reserved

Note: if anyone wants to use any part of this post or any other one, please notify me for permission and make sure you provide a link back to this site.

Thursday, September 21, 2023

Popsicle Sticks as an Outlet for Kid Fun

Popsicle sticks (aka craft sticks) can be used for crafts and games. Here are a few ideas I would like to share.

Did you know?

Eating a frozen Popsicle is still part of growing up in America just as it was in the past.  Frank Epperson, from California, invented and patented the “Epsicle” which later became the “Popsicle.”  In 1905, when Epperson was just 11 years old, he mixed some soda water powder to drink.  He accidentally left it overnight on the back porch with the stirring stick inside.  That night the temperature dropped to a record low causing this mixture to freeze.  Voila! The first “Epsicle!”  Today, the Popsicle is manufactured by the Good Humor-Breyers Ice Cream Company.  Popsicles come in a variety of fun shapes and flavors, now even offering natural juices and no-sugar-added Pops.  Not only have Popsicles been treats for our children, the famous wooden sticks are great resources for arts, crafts, games, and learning.

CRAFT STICKS AND CRAYONS (crayons & Popsicle sticks)—
Place Popsicle sticks, crayons and white paper on the table.  Invite the children to make designs on the paper by tracing around the sticks with their colorful crayons.  Teach your kids the art of overlapping.

POPSICLE FRAMES (Popsicle Sticks)—
Glue Popsicle sticks into shapes, such as squares and triangles.  You can even create a star by laying one triangle on top of another.  Glue the sticks together.  Trim a photograph to fit the inside of your frame and glue this to the back of the frame.  As a variation, you could glue a plain piece of heavy paper in place to be colored, painted, or decorated inside the frame.  This is an easy project to hang; just attach a loop of yarn or ribbon to the top.

PICK-UP STICKS (Popsicle Sticks)—
Use Popsicle sticks to play a game of pick-up sticks.  This is played just like pick-up sticks except that when your turn is finished you have to add your sticks to that of the person before you.  Let’s say Mom was able to pick up five sticks before she moved any of the others.  Then Bobby picked up three without moving the rest of the sticks.  Bobby would note that since Mom picked up five and he picked up three, then there are eight sticks picked up so far.  Therefore, five plus three equals eight.  If he gets it right, he gets Mom’s sticks.  If he gets it wrong, Mom gets her sticks. This makes the game an incentive to learn math facts.

Kids love to eat Popsicles - so save all those sticks for further fun!

You can also purchase a bag of sticks on AMAZON.

There are pre-colored sticks too! HERE


Photo courtesy of Tania Cowling, all rights reserved

Friday, July 7, 2023

Paper Plate Frog for Summer Crafting


During summer, kids are anxious to go outdoors to observe nature. Most children have seen a frog picture in books, but have they seen a real frog in its habitat? Your child will flip over this fun frog craft made with simple materials at home. It can even be manipulated like a puppet so the kiddos can make plenty of “ribbit” sounds with their frog project. Frogs are a perfect theme to get the youngsters thinking of the outdoors and participating in frog-acting games like leap frog and lily pad leapers. You’ll all have a hoppin’ good time!
Materials:
  • Paper plate
  • Green paint
  • Paintbrush
  • Construction paper
  • Cotton balls or pom-poms
  • Heavy-duty glue
  • Wiggly eyes (optional)

Directions:
Step 1 – Prepare your work area for messy art. Your child will be painting and gluing with this craft, so spread newspapers on the table and floor. Wearing a smock or adult tee shirt will help protect your child’s clothing.
Step 2 – Invite your child to paint both sides of a paper plate (the paper kind, not a foam one) with green paint. Set this aside to dry.
Step 3 –In the meantime, draw and cut out four green legs from construction paper and a red forked tongue. Cutting on the lines of these shapes help to develop scissor skills in young children. The very youngest may need your help.
Step 4 – When the paper plate is dry, fold it in half. This makes the frog’s head/face and mouth.
Step 5 – Glue the four legs inside the folded area – one on each side and two at the bottom. Glue a red tongue inside the mouth.
Step 6 – On top of the folded plate is the frog’s head and face. Find two cotton balls or pom-poms and glue these as the frog’s eyeballs. You can then glue on round wiggly eyes in the middle of the balls or as a variation use a hole punch and make two small black circles from construction paper.
Step 7 – After all the parts are dry, the frog puppet is now ready to manipulate. Your child can use his hand to hold the frog puppet and move the mouth to open and close.
Think about using this frog puppet to enhance songs, rhymes, and just to imitate “froggie” sounds. As the saying goes, “It’s fun to be green if you know what I mean!”
Until next week,
Happy Parenting,
Tania :)
Photo courtesy of Tania Cowling, all rights reserved 

Saturday, April 22, 2023

4 Earth Day Activities for Children


Earth Day is celebrated April 22. Use these fun activities to teach children the importance of taking care of our planet and learning to become environmentally friendly.

Children can develop an understanding of protecting our environment with the help of adults who make them aware of the fact that we are all interdependent. We can be guardians of the plants and animals in our surroundings. Below are several activities to help develop awareness for Earth Day and every day.

Take a litter walk together

Put some excitement into a clean-up litter walk by also making it a scavenger hunt. Together, make a list of various types of things that when thrown away becomes litter, such as soda cans, newspaper, paper cups, plastic or glass bottles, and so on. Children can become aware that certain items, although good in themselves, can become litter when discarded -- and litter dirties up our Earth.

When walking, take a brown bag and the list. When the child finds an item on the list, check it off. See how long it takes to cross off each item. Of course, dump the litter in appropriate containers -- some may be recycled.

Grow-it-again foods

A great way to save the Earth is to repopulate things that we eat. Many fruits and vegetables can be grown again by planting the seeds or stalks. Here are a few examples.

Pineapple: Cut off the top and trim three rows of the bottom leaves. Let this dry for a few days and then plant the pineapple top into the soil, with the top above ground. Keep it moist and in a sunny place. Pineapples will repopulate into new plants that will eventually bear fruit.

Onion: Find an onion that has already sprouted. Plant it in the soil and watch it regrow into a new onion.
 
Carrot: Cut off the top and trim off any leaves. Place in a layer of pebbles in a low dish container. Keep it well watered and when the carrots sprout roots, plant in the ground.

Avocado: Place three toothpicks into an avocado seed. Set this inside the mouth of a jar filled with water. Place this in partial sunlight. When the roots sprout about four to five inches, plant this in soil outdoors.

Learn to compost


If you garden with your children, you may want to start a compost pile. Composting takes time to break down, but becomes great fertilizer for a garden. Children can also see how some waste materials can be recycled. A compost pile uses vegetable scraps such as potato peels, carrot scrapings, cornhusks, lettuce, cabbage, and onion peels. It can also use coffee grounds, plant clippings and grass.

To make a compost pile, surround a small area with chicken wire. Place another small circle of chicken wire in the center to help circulate the air. Layer the vegetable scraps with fresh soil. Keep it moist and add some lime and fertilizer. Continue the layers, always covering with soil. You will have good rich mulch for a garden within a few months.

Recycle together as a family

Introduce your children to the recycle emblem on many products. Talk about why we recycle. Discuss the differences in packaging of goods -- paper, plastic, and glass. Ask the kids, which would be better to use and why? Together, make a game of sorting product containers using paper, plastic, cans, and glass (do not sort glass with very young children). This is a good activity that teaches classifying as a math skill. Have a recycle center at your home and ask the children to use it daily.

After these discussions, brainstorm together ways that will help our Earth -- like use cloth towels instead of paper towels in the kitchen, don't let the water run needlessly, turn out the lights when you leave a room, and use both sides of the paper when drawing or coloring. Better yet, use junk mail for extra drawing paper on the clean side.


As parents, we can show our children how some things taken from nature can be returned to help it thrive.

Until next week -- Happy Parenting,
Tania

Disclosure: This post may contain affiliate links or advertisements. I earn a small commission if you click and shop through them, which helps fund this website so I can continue to bring you informative and interesting content. All opinions are my own. 


Free photos courtesy of Pixabay.com

Monday, April 17, 2023

Umbrella Art for Rainy Days


During spring rain showers occur frequently. We sure have had our share in Florida lately. As you discuss rainy weather with your youngsters, talk about what they wear while walking in the drizzling precipitation. While the kiddos answer raincoats and boots, talk about umbrellas as well. This cut, paste, and print craft design envisions a child hiding behind a big umbrella and all you can see is the child’s rain boots. After they finish cutting and gluing all the pieces, bring out some blue paint for some raindrop printing. What fun!
Materials:
  • Card stock or construction paper
  • Fancy paper, such as gift wrap or scrapbook paper
  • Black construction paper
  • Blue poster paint
  • Paper plate
  • School glue
  • Safety scissors
  • Black marker

Directions:
Step 1 – Cover your work surfaces with newspaper to prevent marring your furniture or messing your floor with glue and paint. You may want to dress your child in a paint smock to protect clothing.
Step 2 – Choose a fancy paper for the umbrella. Think about stripes, dots, or a cute design that can be found on gift wrap or scrapbook paper.
Step 3 – With a pencil or marker, draw a large umbrella (about 8-inches in diameter) onto the print paper. Invite your child to cut on the lines to create this shape. Very young children may need your help with this step.
Step 4 – Draw and cut out a pair of rain boots from black construction paper.
Step 5 – Take the umbrella and boots and have your child glue them onto a background page. It’s best to use a pastel color where the upcoming raindrops will show up nicely.
Step 6 – Mom may want to take a black marker and draw lines (to the points) making this umbrella look real on the page.
Step 7 – After the shapes have dried, it’s time to create raindrops.  Place a dollop of blue poster paint onto a small paper plate. Show your child how to dip his pointer finger into the paint and make a print on the paper plate for practice. After he gets the hang of this technique, have him make numerous raindrop prints randomly on the page around the umbrella.
Praise your youngster for her artwork and hang it in the house where all the family can see it. Talk about how an umbrella can protect a person from getting wet during rain showers. Crafting can be a time of bonding and there are many teachable moments while you work together.
If you like what you see, please subscribe to this blog. Are you looking for a specific craft? Product review? Parenting tips? Shoot me an email to: taniacowling@gmail.com and I will try to help you in future posts.

Until next time. Happy Parenting.
Tania

Photo courtesy of Tania Cowling, all rights reserved

Thursday, March 9, 2023

How Do You Amuse the Kids on St. Patrick's Day?


Calling all teachers and parents:

Lads and lassies, get ready to celebrate a “wee-bit of fun” this March 17th on St. Patrick’s Day. 


Doing the shamrock stomp:  (baby & toddler)
Put on some music (like an Irish jig or McNamara’s Band) and invite your child to dance along with you.  For young babies, hold them in your arms while you dance.  Encourage him to come up with a variety of ways to move to the music.  To do the “Shamrock Stomp”, cut out large shamrock shapes from green construction paper.  Tape these to the floor.  Start the music and have your child move and jump from shamrock to shamrock.  This is a fun way for your youngster to express himself on St. Patrick’s Day and great for practicing large motor skills.  Masking tape on the floor can be another entertaining movement game.  Stick the tape on the floor to make a design, such as a zigzag, a circle, triangle or a star.  Let your child move along, over and around the lines as they please.

Click here to purchase this CD

How about the shamrock shimmy?  (preschool+)
Here’s a fun locomotion game to play with your child.  It’s even better if you can gather other family members or friends.  Cut several small shamrocks from green construction paper.  Write instructions on the one side like:  hop like a bunny, gallop like a horse, crawl like a snake, walk like an elephant, whistle like a leprechaun, skip, walk backwards, etc.  Place these instructional shamrocks in a container on the other side of the room.  Play this like a relay race, as the first person runs to the pile, takes a shamrock and does what it says while returning to his/her team, then sits down. Station an adult to help read the instructions.  The next team member proceeds the same way until everyone has a turn.  Another fun St. Paddy game is “Irish Hot Potato.”  Sit all players in a circle.  Hand one child a potato.  Explain that when the music begins, they will pass the potato to the person on their right.  When the music stops whoever’s holding the potato scoots out of the circle and playing resumes. Who will end up in the circle alone with the potato? Play some Celtic or Irish Jig music to get into the spirit, although any music will do.

Cover photo courtesy of Tumisu, CC0 Public Domain, pixabay.com

Quick shopping for materials you will need for these activities:

Friday, February 3, 2023

Valentine Crafts for the Young


It's coming on February 14th. Time to get started on Valentine crafts. Here are a few to try.

I know your children make Valentines in school and daycare, but there is nothing like getting out the art supplies and creating memorable decorations and gifts with your little one at home. This is something I cherished with my children and now my grandkids. Kids are only young once, savor every moment.

CD Photo Magnet—


This is a project you and your child can make for gifts and recipients can truly enjoy.  Recycle old CD’s (or the ones you get in the mail). Glue a picture of your child on the front, in the center.  With a colorful paint pen, write, “Your Love Makes My Heart Sing” around the disk. Decorate with cute little hearts, drawn freehand or you can use stickers. Attach a small piece of adhesive magnetic tape to the backside of the disk. This tape is easily found in craft stores.  Just think; this project idea can be used for multiple holidays—just by changing colors and decorative designs.  It’s also a craft project that older children may enjoy making themselves!

Everybody Loves A T-Shirt!

How about one with meaning? You can use this technique on canvas bags, baseball caps, and hand towels too. Use your imagination and have fun!  With a fabric paint marker write, “Behind every hand is a heart that loves Dad” (or Grandma, or whomever the shirt is for).  Gently paint the hands of your child with fabric paint and press them on any area of the shirt.  Use a variety of colors and allow the shirt to dry.  Make sure to wash your child’s hands thoroughly.  For an added touch, date the shirt with a laundry marker or fabric paint marker.

Making Tie-Dyed Valentines—

A tie-dyed print doesn’t have to be messy.  Here is a way to get this same effect using simple art materials.  Flatten a white coffee filter and place it onto a sheet of cardboard or anything that will protect your table.  Invite your child to draw Valentine designs (actually scribbles will do) onto the filter with washable color markers covering a vast surface.  Fold the filter into quarters and dip it into cold water for just a second.  Your child will be amazed as he/she sees the colors blend.  Open the filter and lay it flat to dry.  When completely dry, show your child how to cut hearts from this unique paper.

Spend quality time bonding and making memorable crafts for this holiday. They are fun too!
Happy Parenting,
Tania  

Contact me for republication of any part of this blog post with a link back to Creative Preschool Time 


Wednesday, January 11, 2023

It's All About Family: Activities for Kids


Spend "together time" as a family. Celebrate this very special relationship by using a variety of activities that focus on the family theme. Take this theme into reading, writing, speaking, music, and art.
My Family Quilt

There is nothing cozier than a quilt. They feel like home. Begin this lesson by reading The Patchwork Quilt by Valerie Flournoy and discuss the importance of family and what family means to each child. Talk about the making of quilts and how you can incorporate family heirlooms and memories inside this stitched piece of art.

Why not try an art project involving quilts? Cut out squares of pastel-colored paper. Invite the kids to draw and color a quilt block for each member of the family including pets. Draw the person and surround the headshot with things they love. Now, if you have an odd number of family members, just have the child create an extra quilt block (or two) with some of his/her favorite things. When all blocks are done, glue them together onto a sheet of poster board. Next, take a black marker and create stitch marks around each quilt block to replicate the real stitching on a quilt – a work of art that has spanned generations.

Family Fun and Laughs
For this themed activity, read the book The Relatives Came by Cynthia Rylant. It’s a fun pairing of words and pictures that capture the energy and love that flows from a family reunion. After reading the story together, take time to share memories of family experiences.

For a project, have the kids think of a specific family gathering.  At the top of the page of paper, write the event in a large circle. Next, branch down to the next level and add all the family members who attended. The third row holds circles for things that happened during the event.  The last row of circles includes thoughts of how the children felt during this family gathering.  This “graphic organizer” project helps kids to express how they feel about their family, the events, and even tips for future family gatherings. This organizer design is almost like an outline for when students are asked to write a story.
CONTINUE READING... (a Bright Hub Education article by Tania Cowling)


Books available on Amazon -- Click to Purchase

The Relatives Came
The Patchwork Quilt

Family is always a good theme to engage children in discussion and activities. Children learn through books and art -- get them involved today. 

Happy Parenting,
Tania  :)

This post may contain affiliate links. The money we make from linking helps to keep this website up and running. 

Tuesday, December 27, 2022

Getting Ready for 2023 With the Kids: Games to Play


New Year’s Eve has all the fixings for a true children’s celebration—the chance to stay up way past bedtime, toss confetti in the air, sport silly hats, and raise a toast. Whether you want to ring in 2023 with your child at a family party or throw a sleepover bash for all his/her friends, the following games are here for you to consider.

CELEBRATE WITH BUBBLE WRAP—
Tape sheets of bubble wrap (small bubbles and large ones) to a hard floor or driveway.  When the New Year’s countdown concludes have the kids stomp on the bubble wrap to make loud popping sounds.  Sure safer than fireworks!

NEW YEAR FREEZE DANCING—
Give each child a noisemaker horn. Play some peppy music and while the music is playing the kids can blow their horns. When the music stops, the children freeze and yell “Happy New Year.”  This is a fun game—but beware—it can get very LOUD!

THE MOUSE RAN UP THE CLOCK—
This game is based on the “Red Light, Green Light” activity.  One child is the “Grandfather Clock” and stands with his back to the players (mice). He calls out hours at random, and the mice race to take that number of steps before “Grandfather” turns around. Those who fail must return to start. The first mouse to “run up the clock” wins.

HIDE THE CLOCK—
An adult hides a ticking clock. Gather the kids and have them find it.  Another fun way is to set the alarm for 5-7 minutes, if the kids don’t find the clock—the alarm will surely give a loud clue.

FESTIVE BUBBLES—
Set out a pie plate with homemade soap solution. Mix 3 parts water to 1 part “Joy” or “Dawn” dishwashing liquid.  For lots of miniature bubbles, tape together a bunch of plastic drinking straws.  Dip one end in the bubble solution, hold the other end about one inch from your mouth (do not put your lips on the straws) and blow. For the big dipper, twist one end of a pipe cleaner into a large loop, dip it in the soap solution then slowly wave it in the air to create a giant bubble.

PLAY VOLLEY BALLOON—
Batting a balloon back and forth may sound easy, but in this challenge, there’s a catch:  Each contestant must link an arm with his/her partner, leaving just one hand free for the task. Whichever pair is able to volley their balloon the longest wins.

HAPPY NEW YEAR TO ALL MY READERS,

TANIA  :)


Photo courtesy of geralt, CCO Public Domain on Pixabay.com
Sources for games:
Channels to Children by Carol Beckman, Roberta Simmons, and Nancy Thomas, copyright 1982
Family Fun Parties, culminated by Deanna F. Cook, copyright 1999


Wednesday, November 2, 2022

Get Ready for Thanksgiving With Fun Turkey Songs


Turkeys are large birds, both wild and domestic. The Pilgrims hunted wild turkeys for their Thanksgiving feast and this bird has become a tradition in most American families for this holiday. Turkeys walk with a specific waddle that children love to imitate. Invite the children to pretend to be turkeys as they sing these songs.

How many ways can the Hokey Pokey be adapted? Here is a version for Thanksgiving with plenty of movement.

You put your right wing in (the elbow),
You take your right wing out,
You put your right wing in and you shake it all about.
You do the Turkey Pokey and you wobble all around.
That's what it's all about.

Continue singing and playing this game with these verses:
You put your left wing in...
You put your right leg in...
You put your left leg in...
You put your head in...
You put your whole self in...

This open-ended song emphasizes the sounds that turkeys make and young children love to act out the infamous 'gobble' sound. Sing this turkey song to the tune of "I'm a Little Teapot."


I'm a little turkey,
My name is Ted.
Here are my feathers,
Here is my head.
Gobble, gobble, gobble,
Is what I say,
Quick run...It's Thanksgiving Day!

Thanksgiving Dinner Song

Today this holiday is celebrated with a feast (just like the first Thanksgiving) with family, relatives and friends. Sing this song about what good food might be on the table. Use the tune of "Are You Sleeping/ Frere Jacques."

Turkey dinner, turkey dinner,
Gather round, gather round.
Who will get the drumstick?
Yummy, yummy drumstick.
All sit down, all sit down.

Cornbread muffins,
Chestnut stuffing,
Pudding pie, ten feet high.
We were all much thinner, before we sat for dinner.
Me, oh my, me, oh my!

All children benefit from experiences with music. It enhances learning especially the child's language development. These Thanksgiving songs for children will enlighten the holidays with fun music and energetic movement.

Note About Songs: Authors Unknown
Photos courtesy of Pixabay.com --
Thanksgiving, Kaz/1443 and Turkey Cartoon, GraphicMama-team-225; all CCO Public Domain


You have several weeks to teach these cute songs to your children. Music puts us into the happy, holiday mood. Don't you think?

Happy Parenting,
Tania :)