Showing posts with label blogging. Show all posts

Monday, March 25, 2024

Creative Crafts for Easter


Easter/Passover is on its way and the perfect time to craft with the kids. Do you need some ideas? I'm posting a culmination of some articles I wrote the past couple years. They are easy and mostly use materials found in the home. Enjoy your holiday and spring!

Happy Parenting,
Tania


Hatching Baby Chicks

Spring is the season for renewal of life and we often hear about baby chicks hatching from eggs. I would suggest getting a book from the library on hatching baby chicks so the children can understand the process.
You will need:
  • Egg halves (washed and dried)
  • 2 yellow pom-poms (one larger than the other)
  • Googly eyes
  • Orange construction paper
  • Safety scissors
  • Heavy-duty glue
Directions:
  1. Give each child one eggshell and two yellow pom-poms. Have them carefully glue their pom-poms inside the eggshell, one on top of the other. Make sure to have extra eggshells available as these are fragile and could crumble.
  2. Finish this craft by gluing on two eyes and an orange beak cut from construction paper.
  3. You can display these baby chicks inside an egg carton or staple a circular ring from heavy-duty paper to make an egg stand.


  • Crafting With Matzoh for Passover
    For Passover, let the children use broken pieces of matzoh and invite them to glue these pieces onto construction paper. Lots of very creative pictures emerge from this activity. Have them tell you about their design.

  • What’s more fun than painting matzoh? Eating it! Melt white chocolate chips in a bowl (a microwave can be used). Separate the melted chocolate into several bowls. Add drops of food coloring to make a variety of edible paints. Using a clean paintbrush or cotton swabs, invite your child to paint designs and pictures on a square of matzoh. Note: you may have to keep reheating the chocolate to keep it liquid for painting. Chocolate hardens very quickly. Another variation is to use pre-made frosting in tubes that can be purchased in grocery stores. When finished, share the artwork and then enjoy the snack.


  • The Hunts of the Season
    Celebrate Passover with a treasure hunt for the “Afikomen." The matzoh is placed in a holder and here is a simple one to make:
    You will need:
    • Two sheets royal blue felt (9" x 12")
    • Silver glitter glue, decorating decors
    • Tacky glue
    •  
  • Simply glue the two sheets of felt together around the edges, leaving one side open for a piece of matzoh. You could also sew them together if you wish. Draw six-sided stars with glitter glue. You can also add decors like lace, sequins, or faux jewels with the tacky glue. Let dry completely and you are ready to place this work of art on the Seder table.
    To hunt for the Afikomen, hide this piece of matzoh in the holder somewhere in the home. Present a few clues to lead the kids from the dining area to where the Afikomen is hidden. Whoever finds the matzoh wins a prize. 

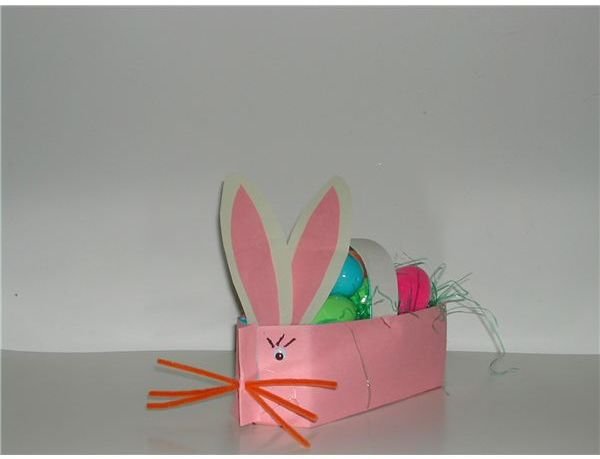
    For Easter, create this cute bunny basket for your youngster to collect his “finds of the hunt." Take a half-gallon milk carton and remove one panel using safety scissors or a craft knife (adult use only). Save this panel to make a handle. Cover all sides of this carton with construction paper using glue or tape. Cut a strip from the saved panel and staple it on both sides to make a handle. Create a cute bunny face by gluing on googly eyes, stapling on bunny ears made from heavy paper, and lastly whiskers. If you punch a hole in the center of the top ridge; pipe cleaners can be inserted equal distance and bent slightly for bunny whiskers.

  • Making homemade Easter crafts and Passover crafts for kids are milestones and memories that you and your children will never forget. Enjoy this creative time together and the fun holiday festivities to follow!
    Note: Use parental supervision and age appropriate art materials when making crafts with kids.

  • Some crafts were part of articles first published on Bright Hub Education by Tania K Cowling
  • Photos courtesy of Tania Cowling, all rights reserved


Friday, August 4, 2023

Back to School on the Bus Craft


As the summer months come to a close school bells will begin to ring.  Some states begin classes in late August and others wait until after Labor Day in September. When you see the infamous bright yellow school bus on your roads you know that school is in session. Here is a fun school bus craft your child will enjoy making whether he/she rides this iconic form of transportation or not. Why not sing “The Wheels on the Bus” while you are crafting together? With a recycled egg carton and a few supplies that are readily available at home this 3-D bus can be constructed.  So, let’s get started.
Supplies needed to make a School Bus craft:
  • Cardboard egg carton
  • Yellow tempera paint
  • Paintbrush
  • Safety scissors
  • Heavy-duty glue
  • White card stock paper
  • Markers or crayons
  • 2 plastic bottle caps
Directions to follow:
Step 1 – Prepare your work surface with newspaper to avoid paint and glue to mark your table top. You may want to place a smock over your child’s clothes as well.

Step 2 – Cut the lid off your cardboard egg carton. You can also use a yellow Styrofoam egg carton if a cardboard one is not available.

Step 3 – Place the two pieces back-to-back – the top of the lid should be next to the bottom of the egg cups (the open cups should be facing out). Glue these two pieces together. This will give your bus stability to stand up on the table.

Step 4 – Invite the kids to paint the entire bus construction with yellow paint.  Set this aside to dry thoroughly.

Step 5 – While the bus is drying, cut out six circles from white card stock paper. Use a bottle cap or lid to trace around to make the circles the same size. Make sure the circles fit slightly inside each individual egg cup.

Step 6 – Encourage the children to draw facial features on each circle with colorful markers or crayons. Challenge them to draw pictures of their school friends that ride the bus with them.  One circle should be a portrait of your child. Another option is to use photocopies of school pictures you may have of your child’s friends.

Step 7 – Glue these circles into the six egg cups on the top row of the bus.

Step 8 – Place two plastic lid caps on the bottom of the bus as wheels. Glue these securely in place.

Step 9 – The small flap of the egg carton at the top of the bus is a place to write the name of your school, bus route number, or just school bus in general.

Place your finished school bus construction in your home or child’s room as a reminder of the upcoming school days ahead.

How are you and the kids getting ready for school? Tell us in the comment section below.

Photo courtesy of Tania Cowling, all rights reserved

Monday, April 17, 2023

Umbrella Art for Rainy Days


During spring rain showers occur frequently. We sure have had our share in Florida lately. As you discuss rainy weather with your youngsters, talk about what they wear while walking in the drizzling precipitation. While the kiddos answer raincoats and boots, talk about umbrellas as well. This cut, paste, and print craft design envisions a child hiding behind a big umbrella and all you can see is the child’s rain boots. After they finish cutting and gluing all the pieces, bring out some blue paint for some raindrop printing. What fun!
Materials:
  • Card stock or construction paper
  • Fancy paper, such as gift wrap or scrapbook paper
  • Black construction paper
  • Blue poster paint
  • Paper plate
  • School glue
  • Safety scissors
  • Black marker

Directions:
Step 1 – Cover your work surfaces with newspaper to prevent marring your furniture or messing your floor with glue and paint. You may want to dress your child in a paint smock to protect clothing.
Step 2 – Choose a fancy paper for the umbrella. Think about stripes, dots, or a cute design that can be found on gift wrap or scrapbook paper.
Step 3 – With a pencil or marker, draw a large umbrella (about 8-inches in diameter) onto the print paper. Invite your child to cut on the lines to create this shape. Very young children may need your help with this step.
Step 4 – Draw and cut out a pair of rain boots from black construction paper.
Step 5 – Take the umbrella and boots and have your child glue them onto a background page. It’s best to use a pastel color where the upcoming raindrops will show up nicely.
Step 6 – Mom may want to take a black marker and draw lines (to the points) making this umbrella look real on the page.
Step 7 – After the shapes have dried, it’s time to create raindrops.  Place a dollop of blue poster paint onto a small paper plate. Show your child how to dip his pointer finger into the paint and make a print on the paper plate for practice. After he gets the hang of this technique, have him make numerous raindrop prints randomly on the page around the umbrella.
Praise your youngster for her artwork and hang it in the house where all the family can see it. Talk about how an umbrella can protect a person from getting wet during rain showers. Crafting can be a time of bonding and there are many teachable moments while you work together.
If you like what you see, please subscribe to this blog. Are you looking for a specific craft? Product review? Parenting tips? Shoot me an email to: taniacowling@gmail.com and I will try to help you in future posts.

Until next time. Happy Parenting.
Tania

Photo courtesy of Tania Cowling, all rights reserved

Thursday, February 23, 2023

Is Your Tween Ready to Babysit?


Hi all,

I'm trying to expand this blog to cover information that will appeal and offer helpful information to parents with older children, not just preschool. So whether you have an infant, toddler, preschooler, or older child, keep checking my blog for all things parenting. 

Today, I'm focusing on Tweens. Has your child asked you about starting to babysit? Here is a helpful checklist to give to your tween to see if he/she can answer these questions. Is the job right for them? Let's find out!

Happy Parenting,
Tania


BABYSITTING:  ARE YOU READY FOR THIS RESPONSIBLE JOB?

During the tween years, it’s normal to begin your first paying jobs: mowing lawns, walking dogs, or babysitting.  These activities help to build a sense of independence as well as teach the importance of scheduling, dependability and managing finances.  Babysitting is more than watching small children while their parents are away from home; it’s a real job that demands responsibility and full-time attention.  Can you handle this task? Below is a checklist to see if this job is for you! 

§  Are you comfortable staying alone?  It’s important to be at ease being alone at home, both during daylight and nighttime hours.  If you’re nervous about staying home alone, you may not be ready to be alone in someone else’s home and responsible for other children. Some tweens may be okay during the day, but become apprehensive after dark.  In this case, begin with daytime babysitting only.
§  How do you relate to younger children?  Do you treat children with patience and compassion?  Can you take command of situations that require guidance or supervision?  Do younger children respond to you positively?
§  Can you handle unexpected or emergency situations?  Are you able to stay calm and proceed wisely in a crisis?  Preparing a plan of action and learning basic emergency procedures can be helpful in handling unexpected situations that may arise.
§  Are you skilled in the basics of childcare?  Do you know how to hold, feed, and change baby’s diapers?  Can you soothe a crying child who woke up with a bad dream, misses her parents or has fallen during play?  If you feel apprehensive with very young children, maybe sitting with older children would be wise until you gain more experience.
§  Can you handle the business of babysitting?  Babysitting is a job that requires interaction with parents as well as children.  Be businesslike and explain the days and hours you are available.  What you charge per hour.  Try to arrange a visit prior to babysitting to meet the children.  Make arrangements for transportation to and from the job.

If you answer yes to these questions babysitting can be a rewarding experience. Go on to the Internet for babysitting safety tips.  Babysitting Safety Tips

Photo courtesy of Tania Cowling, all rights reserved


Wednesday, January 11, 2023

It's All About Family: Activities for Kids


Spend "together time" as a family. Celebrate this very special relationship by using a variety of activities that focus on the family theme. Take this theme into reading, writing, speaking, music, and art.
My Family Quilt

There is nothing cozier than a quilt. They feel like home. Begin this lesson by reading The Patchwork Quilt by Valerie Flournoy and discuss the importance of family and what family means to each child. Talk about the making of quilts and how you can incorporate family heirlooms and memories inside this stitched piece of art.

Why not try an art project involving quilts? Cut out squares of pastel-colored paper. Invite the kids to draw and color a quilt block for each member of the family including pets. Draw the person and surround the headshot with things they love. Now, if you have an odd number of family members, just have the child create an extra quilt block (or two) with some of his/her favorite things. When all blocks are done, glue them together onto a sheet of poster board. Next, take a black marker and create stitch marks around each quilt block to replicate the real stitching on a quilt – a work of art that has spanned generations.

Family Fun and Laughs
For this themed activity, read the book The Relatives Came by Cynthia Rylant. It’s a fun pairing of words and pictures that capture the energy and love that flows from a family reunion. After reading the story together, take time to share memories of family experiences.

For a project, have the kids think of a specific family gathering.  At the top of the page of paper, write the event in a large circle. Next, branch down to the next level and add all the family members who attended. The third row holds circles for things that happened during the event.  The last row of circles includes thoughts of how the children felt during this family gathering.  This “graphic organizer” project helps kids to express how they feel about their family, the events, and even tips for future family gatherings. This organizer design is almost like an outline for when students are asked to write a story.
CONTINUE READING... (a Bright Hub Education article by Tania Cowling)


Books available on Amazon -- Click to Purchase

The Relatives Came
The Patchwork Quilt

Family is always a good theme to engage children in discussion and activities. Children learn through books and art -- get them involved today. 

Happy Parenting,
Tania  :)

This post may contain affiliate links. The money we make from linking helps to keep this website up and running. 

Tuesday, March 9, 2021

Rainbow Craft for St. Patrick's Day


During St. Patrick’s Day on March 17th  legends arise about tiny shoemakers living in the forest called Leprechauns. These mysterious little men are supposed to be rich and hide their gold in black pots found at the end of the rainbow. It is supposed to be good luck when you see a rainbow, so involve your child in making one that not only is a St. Patrick’s Day craft, but one that teaches about the colors of the rainbow. Teach your little learner the name “Roy G. Biv” (red, orange, yellow, green, blue, indigo, violet) and he will never forget the order of colors in a rainbow.
Materials:
  • Sky blue card stock or construction paper
  • Tempera poster paints (red, orange, yellow, green, blue, violet)
  • Black construction paper
  • Shiny pennies
  • Pencil
  • Heavy-duty glue
  • Safety scissors
  • Paper plate

Directions:
Step 1 – Prepare your work area covering the table and floor with newspaper. This craft involves finger printing with paint and can get messy. You may even want your child to wear a paint smock to protect her clothing.

Step 2 – Place a dollop of paint (one of each color) onto a paper plate to look like an artist’s pallet.

Step 3 – Draw an arch on the sky blue paper large enough for a rainbow that covers two-thirds of the page.

Step 4 – Invite your child to use his pointer finger or thumb to do the printing. First, dip into the red paint and make fingerprints along the lines of the arch. Wash that finger with soap and water and then proceed with the next color that is orange. Continue this procedure one row after the other with yellow, green, blue, and violet paint until the rainbow is completed.

Step 5 – While the paint is drying, cut out a pot shape from black construction paper. Parents may need to draw the pot and the child can cut this out using safety scissors.

Step 6 – Glue the pot shape on the sky blue paper at the foot of the rainbow.

Step 7 – Search for shiny pennies and glue a few on the black pot. You will need to use very heavy-duty glue or a low-temperature glue gun to adhere the pennies.

During this craft session talk with your child about how and why rainbows appear in the sky adding a little science to this art project. A rainbow is a circular arc of colors that appears up in the sky when raindrops are illuminated by the sun.

Then tell the fictional, but symbolic story about the leprechauns and their gold. Storybooks are helpful with this task. Legend says if a leprechaun likes you, he will share this gold and other stories say you must catch the leprechaun for him to lead you to his fortune. ‘Tis the luck of the Irish – Happy St. Patrick’s Day!

Until next time,
Tania


Photo courtesy of Tania Cowling, all rights reserved
Permission needed to reprint this blog


Thursday, May 31, 2018

Diploma Craft for Your Little Graduate


Whether your child is graduating from preschool or kindergarten, it’s time for big dreams and next steps. A diploma is the official certificate that your youngster has made it to the next level of education – it’s a notable memory. This craft is not a true diploma, but a chance for your little graduate to draw and color a self-portrait and present it in diploma style. There are a couple ways to create this project, so choose your art mediums and let’s get started.
Materials:
  • White copy paper
  • Crayons, markers, or watercolors
  • Thin ribbon
  • Computer (optional)
  • Paintbrush (optional)

Directions:
Step 1 – This craft is not really messy, but you may want to cover your tabletop with newspaper. Young children sometimes color outside the lines and may mark your table on accident.
Step 2 – On a clean sheet of white copy paper your child will color a picture of a graduate. This can be a printed black line copy made with your computer or a self-portrait created by your child.  There are websites that offer coloring pages for graduation (see below). These are only two of the many coloring pages sites you can find online.  For a more creative project, have your kiddo draw and color a self-portrait of him or her on graduation day, wearing a gown and mortarboard graduation cap.
Step 3 – Invite the child to use crayons, markers, or even paint with watercolors. Let this page dry thoroughly before the next step.
Step 4 – Carefully roll the paper into a small circular tube.
Step 5 – Tie the diploma roll with a length of thin ribbon. Any color is acceptable, or you could use the shade that coordinates with your school’s colors.
Step 6 – Role-play and present this diploma craft to your child in a mock commencement ceremony.
A couple websites with graduate coloring sheets:
Congratulations to your child, Happy Parenting,
Tania  
Photo courtesy of Tania Cowling, all rights reserved

Saturday, May 5, 2018

Dr. Jacobs Naturals -- Natural Soaps for the Family


Today, I would like to discuss the importance of going natural. I personally do not like chemicals of any kind. I don’t want to ingest them, smell them, or put them on my body. Remember your skin is the largest organ of the body and keeping it safe from chemicals is of utmost importance.

I recently had the opportunity to try Dr. Jacobs Naturals. I was given three castile soap products and I have to say, “I’m in love”! I found these soap products easy to use; they rinse off clean, and smell great. I’m also not a big fragrance person, but these products have light, desirable scents made with natural essential oils. A plus!

I enjoyed the Almond Honey for my daily routine – my favorite. BUT, the Peppermint gave me an invigorating lift in the morning. Dr. Jacobs Naturals also sells bar soaps (which some people prefer). I had the opportunity to test the Coco Loco Limeade (so fresh). These bars are also gentle castile soap, but with a loofah exfoliating experience.

Here is a list of what I like about Dr. Jacobs Naturals:
  • 100% natural ingredients; no preservatives or coloring
  • No synthetic fragrances
  • Non GMO
  • Paraben and Sulfate free
  • Gluten free (a must for people with Celiac disease)
  • No palm oil

The soaps are multipurpose; can be used as a body wash, shampoo, and even a shaving product. It can be used on the face and body.
  • Aloe Vera and vitamin E for moisture
  • Includes Shea butter
  • PETA approved
  • Vegan and Cruelty Free
  • Made in the USA

The products are packaged in attractive dispensers, some with easy to use pumps. There are a variety of scents to choose from. Check out this WEBSITE for more information and ordering.  

Trust me – you will love these products for the entire family. It feels good to do something healthy for the body and the environment.

Until next time – Happy Parenting,
Tania
I want to thank Dr. Jacobs Naturals for the opportunity to try their products. I was not paid or coached to write this blog post. The information about the products was provided and these are my own opinions.


Thursday, April 26, 2018

It’s Finally Time for Some Outdoor Play


Spring has finally come and the weather is now conducive for outdoor play.  It’s time for the kids to put down those digital games (not that they don’t have merit) and grab a toy to exercise those gross motor muscles on terra firma.
I’d like to introduce you to a couple toys from SwimWays (Aerobie). I’m sure your children will enjoy these games with friends and family.
Aerobie Pro Ring™

         For exhilarating flying disc games, the thin design of this flying ring allows the disc to travel longer distances and it features soft edges for comfortable catches.
      The open center allows each player to personalize their throwing and catching style – catch the edge with your hand or use the center to catch it with your arm or foot.
                This flying disc was used to set a Guinness World Record for the farthest throw, an amazing 1,333 feet (406 meters)!
                Aerobie Pro Ring measures 13 inches in diameter.
                Available in assorted colors and sold individually.
                Recommended Age: 12+
                MSRP: $9.99
Availability: Dick’s Sporting Goods,  REI, Academy, Olympia Sports, Amazon, Big 5, Meijer, Fred Meyer, Hobby Lobby, Scheels, and Dunham’s Sports

COOP Scatter Dodgeball™


        A fun twist on the classic game of dodgeball, each player begins with two wristbands of the same color.  At the beginning of each round, players form a circle around the dodgeball while one player rolls the dice. Any player who is wearing a wristband that matches the color face-up on the dice is the thrower and may pick up the dodgeball while the other players scatter.
                As the other players scatter, the thrower attempts to hit them with the dodgeball.  Players that get hit must surrender a wristband to the thrower. If the targeted player catches the ball, the thrower must surrender a wristband. 
                The first person to collect all the wristbands wins!
                Two to six players can play the game
        Each set includes: 1 foam dice, 1 dodgeball (durable, sting proof ball), 12 wristbands (2 of each color) and game instructions
                Recommended Age: 5+
                MSRP: $19.99
                Availability: Target, Amazon


Take a peek at these new spring/summer toys. I’m sure your kids will enjoy them.
Until next time! Happy Parenting,
Tania

I want to thank SwimWays Toys for the opportunity to view their products. I was not paid or coached to write this blog post. The information about the products was provided and these are my own opinions.

Photos courtesy of Tania Cowling and SwimWays, all rights reserved

Tuesday, August 15, 2017

LeapFrog Academy -- An App for Additional Learning


Hello Readers,

Last March I introduced you to the educational LeapFrog toys. Here is the link to my past post: https://creativepreschooltime.blogspot.com/2017/03/keep-learning-during-breaks-from-school.html

Now, I want to tell you about a great learning tool by LeapFrog -- the Academy.

"The Academy is an interactive app learning program for 3-6 year olds that guides children on a variety of fun Learning Adventures that they can play anywhere on a variety of devices.

LeapFrog Academy features a well-rounded curriculum, where children can explore a variety of skills that are important to their development. This exciting, new, subscription-based service offers access to more than 1,000 learning activities for just $7.99 per month.

Additional features of LeapFrog Academy include:

·         No Wi-Fi, no problem! Children have the ability to learn and play on the go, even when Wi-Fi isn’t available. They can play most of their preferred activities by adding up to 24 of them to their “Favorites,” making them accessible to play even without an internet connection.

·         Each LeapFrog Academy subscription includes five free user profiles, so multiple children can each go on their own unique Learning Adventures.

·         There is a wide selection of more than 1,000 learning activities including eBooks, games, puzzles, videos, music and art activities across a variety of Learning Adventures.

·         A Parent Dashboard lets parents choose and change their child’s Learning Adventures. The dashboard also lets them see how their child is progressing, view their account, manage each child’s profile and more.

·         There are no ads or links to take children to other websites, and no in-app purchases, making LeapFrog Academy a safe place for children to play online.

LeapFrog Academy is available now at leapfrogacademy.com and in the iOS and Google Play app stores. New users can try LeapFrog Academy free for one month, then continue the learning fun for $7.99 per month."


Check out an assortment of LeapFrog toys here.

Information about the LeapFrog Academy is courtesy of LeapFrog Enterprises, Inc.
Photo courtesy of Tania Cowling, all rights reserved