Showing posts with label art projects. Show all posts

Monday, March 25, 2024

Creative Crafts for Easter


Easter/Passover is on its way and the perfect time to craft with the kids. Do you need some ideas? I'm posting a culmination of some articles I wrote the past couple years. They are easy and mostly use materials found in the home. Enjoy your holiday and spring!

Happy Parenting,
Tania


Hatching Baby Chicks

Spring is the season for renewal of life and we often hear about baby chicks hatching from eggs. I would suggest getting a book from the library on hatching baby chicks so the children can understand the process.
You will need:
  • Egg halves (washed and dried)
  • 2 yellow pom-poms (one larger than the other)
  • Googly eyes
  • Orange construction paper
  • Safety scissors
  • Heavy-duty glue
Directions:
  1. Give each child one eggshell and two yellow pom-poms. Have them carefully glue their pom-poms inside the eggshell, one on top of the other. Make sure to have extra eggshells available as these are fragile and could crumble.
  2. Finish this craft by gluing on two eyes and an orange beak cut from construction paper.
  3. You can display these baby chicks inside an egg carton or staple a circular ring from heavy-duty paper to make an egg stand.


  • Crafting With Matzoh for Passover
    For Passover, let the children use broken pieces of matzoh and invite them to glue these pieces onto construction paper. Lots of very creative pictures emerge from this activity. Have them tell you about their design.

  • What’s more fun than painting matzoh? Eating it! Melt white chocolate chips in a bowl (a microwave can be used). Separate the melted chocolate into several bowls. Add drops of food coloring to make a variety of edible paints. Using a clean paintbrush or cotton swabs, invite your child to paint designs and pictures on a square of matzoh. Note: you may have to keep reheating the chocolate to keep it liquid for painting. Chocolate hardens very quickly. Another variation is to use pre-made frosting in tubes that can be purchased in grocery stores. When finished, share the artwork and then enjoy the snack.


  • The Hunts of the Season
    Celebrate Passover with a treasure hunt for the “Afikomen." The matzoh is placed in a holder and here is a simple one to make:
    You will need:
    • Two sheets royal blue felt (9" x 12")
    • Silver glitter glue, decorating decors
    • Tacky glue
    •  
  • Simply glue the two sheets of felt together around the edges, leaving one side open for a piece of matzoh. You could also sew them together if you wish. Draw six-sided stars with glitter glue. You can also add decors like lace, sequins, or faux jewels with the tacky glue. Let dry completely and you are ready to place this work of art on the Seder table.
    To hunt for the Afikomen, hide this piece of matzoh in the holder somewhere in the home. Present a few clues to lead the kids from the dining area to where the Afikomen is hidden. Whoever finds the matzoh wins a prize. 

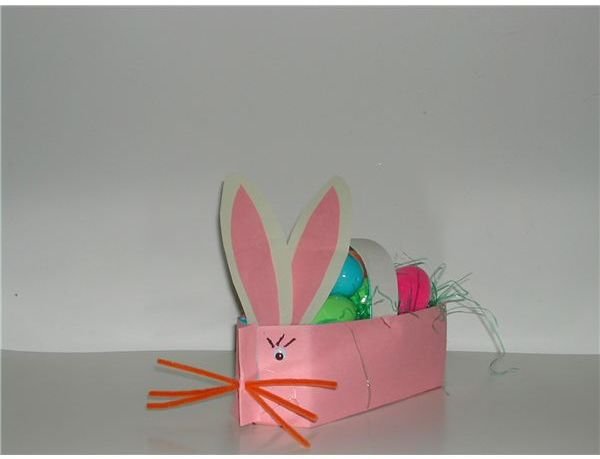
    For Easter, create this cute bunny basket for your youngster to collect his “finds of the hunt." Take a half-gallon milk carton and remove one panel using safety scissors or a craft knife (adult use only). Save this panel to make a handle. Cover all sides of this carton with construction paper using glue or tape. Cut a strip from the saved panel and staple it on both sides to make a handle. Create a cute bunny face by gluing on googly eyes, stapling on bunny ears made from heavy paper, and lastly whiskers. If you punch a hole in the center of the top ridge; pipe cleaners can be inserted equal distance and bent slightly for bunny whiskers.

  • Making homemade Easter crafts and Passover crafts for kids are milestones and memories that you and your children will never forget. Enjoy this creative time together and the fun holiday festivities to follow!
    Note: Use parental supervision and age appropriate art materials when making crafts with kids.

  • Some crafts were part of articles first published on Bright Hub Education by Tania K Cowling
  • Photos courtesy of Tania Cowling, all rights reserved


Friday, August 4, 2023

Back to School on the Bus Craft


As the summer months come to a close school bells will begin to ring.  Some states begin classes in late August and others wait until after Labor Day in September. When you see the infamous bright yellow school bus on your roads you know that school is in session. Here is a fun school bus craft your child will enjoy making whether he/she rides this iconic form of transportation or not. Why not sing “The Wheels on the Bus” while you are crafting together? With a recycled egg carton and a few supplies that are readily available at home this 3-D bus can be constructed.  So, let’s get started.
Supplies needed to make a School Bus craft:
  • Cardboard egg carton
  • Yellow tempera paint
  • Paintbrush
  • Safety scissors
  • Heavy-duty glue
  • White card stock paper
  • Markers or crayons
  • 2 plastic bottle caps
Directions to follow:
Step 1 – Prepare your work surface with newspaper to avoid paint and glue to mark your table top. You may want to place a smock over your child’s clothes as well.

Step 2 – Cut the lid off your cardboard egg carton. You can also use a yellow Styrofoam egg carton if a cardboard one is not available.

Step 3 – Place the two pieces back-to-back – the top of the lid should be next to the bottom of the egg cups (the open cups should be facing out). Glue these two pieces together. This will give your bus stability to stand up on the table.

Step 4 – Invite the kids to paint the entire bus construction with yellow paint.  Set this aside to dry thoroughly.

Step 5 – While the bus is drying, cut out six circles from white card stock paper. Use a bottle cap or lid to trace around to make the circles the same size. Make sure the circles fit slightly inside each individual egg cup.

Step 6 – Encourage the children to draw facial features on each circle with colorful markers or crayons. Challenge them to draw pictures of their school friends that ride the bus with them.  One circle should be a portrait of your child. Another option is to use photocopies of school pictures you may have of your child’s friends.

Step 7 – Glue these circles into the six egg cups on the top row of the bus.

Step 8 – Place two plastic lid caps on the bottom of the bus as wheels. Glue these securely in place.

Step 9 – The small flap of the egg carton at the top of the bus is a place to write the name of your school, bus route number, or just school bus in general.

Place your finished school bus construction in your home or child’s room as a reminder of the upcoming school days ahead.

How are you and the kids getting ready for school? Tell us in the comment section below.

Photo courtesy of Tania Cowling, all rights reserved

Friday, July 7, 2023

Paper Plate Frog for Summer Crafting


During summer, kids are anxious to go outdoors to observe nature. Most children have seen a frog picture in books, but have they seen a real frog in its habitat? Your child will flip over this fun frog craft made with simple materials at home. It can even be manipulated like a puppet so the kiddos can make plenty of “ribbit” sounds with their frog project. Frogs are a perfect theme to get the youngsters thinking of the outdoors and participating in frog-acting games like leap frog and lily pad leapers. You’ll all have a hoppin’ good time!
Materials:
  • Paper plate
  • Green paint
  • Paintbrush
  • Construction paper
  • Cotton balls or pom-poms
  • Heavy-duty glue
  • Wiggly eyes (optional)

Directions:
Step 1 – Prepare your work area for messy art. Your child will be painting and gluing with this craft, so spread newspapers on the table and floor. Wearing a smock or adult tee shirt will help protect your child’s clothing.
Step 2 – Invite your child to paint both sides of a paper plate (the paper kind, not a foam one) with green paint. Set this aside to dry.
Step 3 –In the meantime, draw and cut out four green legs from construction paper and a red forked tongue. Cutting on the lines of these shapes help to develop scissor skills in young children. The very youngest may need your help.
Step 4 – When the paper plate is dry, fold it in half. This makes the frog’s head/face and mouth.
Step 5 – Glue the four legs inside the folded area – one on each side and two at the bottom. Glue a red tongue inside the mouth.
Step 6 – On top of the folded plate is the frog’s head and face. Find two cotton balls or pom-poms and glue these as the frog’s eyeballs. You can then glue on round wiggly eyes in the middle of the balls or as a variation use a hole punch and make two small black circles from construction paper.
Step 7 – After all the parts are dry, the frog puppet is now ready to manipulate. Your child can use his hand to hold the frog puppet and move the mouth to open and close.
Think about using this frog puppet to enhance songs, rhymes, and just to imitate “froggie” sounds. As the saying goes, “It’s fun to be green if you know what I mean!”
Until next week,
Happy Parenting,
Tania :)
Photo courtesy of Tania Cowling, all rights reserved 

Monday, April 17, 2023

Umbrella Art for Rainy Days


During spring rain showers occur frequently. We sure have had our share in Florida lately. As you discuss rainy weather with your youngsters, talk about what they wear while walking in the drizzling precipitation. While the kiddos answer raincoats and boots, talk about umbrellas as well. This cut, paste, and print craft design envisions a child hiding behind a big umbrella and all you can see is the child’s rain boots. After they finish cutting and gluing all the pieces, bring out some blue paint for some raindrop printing. What fun!
Materials:
  • Card stock or construction paper
  • Fancy paper, such as gift wrap or scrapbook paper
  • Black construction paper
  • Blue poster paint
  • Paper plate
  • School glue
  • Safety scissors
  • Black marker

Directions:
Step 1 – Cover your work surfaces with newspaper to prevent marring your furniture or messing your floor with glue and paint. You may want to dress your child in a paint smock to protect clothing.
Step 2 – Choose a fancy paper for the umbrella. Think about stripes, dots, or a cute design that can be found on gift wrap or scrapbook paper.
Step 3 – With a pencil or marker, draw a large umbrella (about 8-inches in diameter) onto the print paper. Invite your child to cut on the lines to create this shape. Very young children may need your help with this step.
Step 4 – Draw and cut out a pair of rain boots from black construction paper.
Step 5 – Take the umbrella and boots and have your child glue them onto a background page. It’s best to use a pastel color where the upcoming raindrops will show up nicely.
Step 6 – Mom may want to take a black marker and draw lines (to the points) making this umbrella look real on the page.
Step 7 – After the shapes have dried, it’s time to create raindrops.  Place a dollop of blue poster paint onto a small paper plate. Show your child how to dip his pointer finger into the paint and make a print on the paper plate for practice. After he gets the hang of this technique, have him make numerous raindrop prints randomly on the page around the umbrella.
Praise your youngster for her artwork and hang it in the house where all the family can see it. Talk about how an umbrella can protect a person from getting wet during rain showers. Crafting can be a time of bonding and there are many teachable moments while you work together.
If you like what you see, please subscribe to this blog. Are you looking for a specific craft? Product review? Parenting tips? Shoot me an email to: taniacowling@gmail.com and I will try to help you in future posts.

Until next time. Happy Parenting.
Tania

Photo courtesy of Tania Cowling, all rights reserved

Friday, February 3, 2023

Valentine Crafts for the Young


It's coming on February 14th. Time to get started on Valentine crafts. Here are a few to try.

I know your children make Valentines in school and daycare, but there is nothing like getting out the art supplies and creating memorable decorations and gifts with your little one at home. This is something I cherished with my children and now my grandkids. Kids are only young once, savor every moment.

CD Photo Magnet—


This is a project you and your child can make for gifts and recipients can truly enjoy.  Recycle old CD’s (or the ones you get in the mail). Glue a picture of your child on the front, in the center.  With a colorful paint pen, write, “Your Love Makes My Heart Sing” around the disk. Decorate with cute little hearts, drawn freehand or you can use stickers. Attach a small piece of adhesive magnetic tape to the backside of the disk. This tape is easily found in craft stores.  Just think; this project idea can be used for multiple holidays—just by changing colors and decorative designs.  It’s also a craft project that older children may enjoy making themselves!

Everybody Loves A T-Shirt!

How about one with meaning? You can use this technique on canvas bags, baseball caps, and hand towels too. Use your imagination and have fun!  With a fabric paint marker write, “Behind every hand is a heart that loves Dad” (or Grandma, or whomever the shirt is for).  Gently paint the hands of your child with fabric paint and press them on any area of the shirt.  Use a variety of colors and allow the shirt to dry.  Make sure to wash your child’s hands thoroughly.  For an added touch, date the shirt with a laundry marker or fabric paint marker.

Making Tie-Dyed Valentines—

A tie-dyed print doesn’t have to be messy.  Here is a way to get this same effect using simple art materials.  Flatten a white coffee filter and place it onto a sheet of cardboard or anything that will protect your table.  Invite your child to draw Valentine designs (actually scribbles will do) onto the filter with washable color markers covering a vast surface.  Fold the filter into quarters and dip it into cold water for just a second.  Your child will be amazed as he/she sees the colors blend.  Open the filter and lay it flat to dry.  When completely dry, show your child how to cut hearts from this unique paper.

Spend quality time bonding and making memorable crafts for this holiday. They are fun too!
Happy Parenting,
Tania  

Contact me for republication of any part of this blog post with a link back to Creative Preschool Time 


Wednesday, January 11, 2023

It's All About Family: Activities for Kids


Spend "together time" as a family. Celebrate this very special relationship by using a variety of activities that focus on the family theme. Take this theme into reading, writing, speaking, music, and art.
My Family Quilt

There is nothing cozier than a quilt. They feel like home. Begin this lesson by reading The Patchwork Quilt by Valerie Flournoy and discuss the importance of family and what family means to each child. Talk about the making of quilts and how you can incorporate family heirlooms and memories inside this stitched piece of art.

Why not try an art project involving quilts? Cut out squares of pastel-colored paper. Invite the kids to draw and color a quilt block for each member of the family including pets. Draw the person and surround the headshot with things they love. Now, if you have an odd number of family members, just have the child create an extra quilt block (or two) with some of his/her favorite things. When all blocks are done, glue them together onto a sheet of poster board. Next, take a black marker and create stitch marks around each quilt block to replicate the real stitching on a quilt – a work of art that has spanned generations.

Family Fun and Laughs
For this themed activity, read the book The Relatives Came by Cynthia Rylant. It’s a fun pairing of words and pictures that capture the energy and love that flows from a family reunion. After reading the story together, take time to share memories of family experiences.

For a project, have the kids think of a specific family gathering.  At the top of the page of paper, write the event in a large circle. Next, branch down to the next level and add all the family members who attended. The third row holds circles for things that happened during the event.  The last row of circles includes thoughts of how the children felt during this family gathering.  This “graphic organizer” project helps kids to express how they feel about their family, the events, and even tips for future family gatherings. This organizer design is almost like an outline for when students are asked to write a story.
CONTINUE READING... (a Bright Hub Education article by Tania Cowling)


Books available on Amazon -- Click to Purchase

The Relatives Came
The Patchwork Quilt

Family is always a good theme to engage children in discussion and activities. Children learn through books and art -- get them involved today. 

Happy Parenting,
Tania  :)

This post may contain affiliate links. The money we make from linking helps to keep this website up and running. 

Friday, February 25, 2022

March Winds Are Perfect for Kites


“March comes in like a lion and goes out like a lamb” is the common phrase for this month’s unpredictable weather. Discuss weather changes with your children by charting lion days (blustery, windy) and lamb days (spring-like) on a March calendar. Ask your child what he would like to do on a windy day? Have you tried flying a kite when the March wind blows? Here’s a fun craft to make that signifies the windy weather and a kite-flying theme. There are several art techniques with this project that are sure to keep your child amused.
Materials:
  • Clear adhesive paper
  • Colorful tissue paper
  • Safety scissors
  • Tape
  • Black marker
  • Stapler
  • Ribbon
  • Construction paper in several colors

Directions:

Step 1 – Cut a large square of clear self-adhesive paper and tape the clear plastic side down onto a table. Peel off the protective paper so the sticky side is facing up.

Step 2 – Gather some tissue paper in several colors, preferably spring-like hues. Cut the tissue paper into small squares or other geometric shapes.

Step 3 – Instruct the child to take the squares (or shapes) and place them onto the sticky paper. Let them cover half of the sticky paper with these shapes.

Step 4 – Carefully fold over the one side of the adhesive paper and press it down firmly.  Rub over the folded plastic to release any air bubbles. Now, the colorful tissue paper is inside the plastic sheet.

Step 5 – Draw a kite shape (diamond) in the middle of this large square and invite the child to cut this plastic kite out. You can draw a vertical and horizontal line on the front side of the diamond to look like a real kite.

Step 6 – Next, cut a piece of ribbon, about a foot long and fishtail the end. Staple this to the bottom point of the diamond shape. This is the kite’s tail.

Step 7 – To help the kite tail do its job small ribbon rungs can be cut from construction paper (bow-tie shape) and stapled to the main ribbon tail.  A kite’s tail helps to steer the kite in the proper direction using a combination of weight and air resistance to steer or trail this flying object.

Step 8 – Display your child’s artistic kite in his/her bedroom – on the wall or hanging from the ceiling.

On your next blustery day, why not take the kids outdoors and attempt to fly a real kite? It’s a fun sport and will give you and your kids plenty of exercise chasing this soaring toy.

Photo courtesy of Tania Cowling, all rights reserved 

Tuesday, June 29, 2021

Celebrating July 4th With the Kids


July 4th is the birthday of our country and the most important of all our national holidays. This holiday commemorates the adoption on July 4, 1776, of the final draft of the Declaration of Independence by the Continental Congress to proclaim America’s freedom from British rule. Every year Independence Day (July 4th) is the legal holiday celebrated throughout the country with picnics, parades and firework displays after dark. Just as you celebrate birthdays of family members, use this day to have a birthday party for our country.  Decorate the house, prepare festive foods, play Americana games; get the family involved in activities relating to this historic event. Here are some tips to make this a “sparkling” holiday.

Recycled Noisemakers

it wouldn't be a celebration without noisemakers. Here are two simple ones to make from recycled trash and a few art materials. 

The first shaker is made with plastic water bottles. After you clean the bottle (dry it) and take off the label, brainstorm with the kids what you want to put inside for noise and for a pretty display. My gang chose sparkly pipe cleaners, wooden beads, jingle bells, feathers, and such. There are endless possibilities. To make sure the contents do not spill out, run a bead of glue inside the lid before screwing on the top. These bottle shakers are so cute to make for other events such as birthday parties, New Year's Eve, and more. What a fun take-home craft!

The next shaker is using empty soda cans. Clean the cans and let them air dry. Invite the kiddos to fill the can with pebbles, rice, or coins. Tell them to be careful of their fingers when filling the can. The opening is sharp.  When finished, tape the opening closed with heavy-duty tapes, like duct tape. Proceed to wrap the can with construction paper and decorate with drawings, stickers, and other baubles you can glue on. Top the can with a cluster of ribbons. I found that the clusters you buy from the gift wrap section of your favorite store works best (and easy). Sometimes you can find these ribbons at a dollar store.

Around the USA Game
You can't have a successful party without a game or two. This one is fun and makes you think!

Gather the family together and have them sit in a circle.  The first player announces, “I’m traveling around the country and in [state] I visited [place].  For example, “I’m traveling around the country, and in New York I visited the Statue of Liberty.”  The next player must repeat what the first player said (“I’m traveling around the country, and in New York I visited the Statue of Liberty”) and add another phrase like, “and then I traveled to Pennsylvania and visited the Liberty Bell.”  Play continues around the circle with each player repeating previous phrases, and then adding a new one.  As a player forgets an item in the list, he/she is eliminated from play until one winner remains.

Wishing you all a happy and safe Independence Day!
Happy Parenting,
Tania :)

If you enjoy this parenting blog, please share it with your friends. We build readership from word of mouth.

Tuesday, March 9, 2021

Rainbow Craft for St. Patrick's Day


During St. Patrick’s Day on March 17th  legends arise about tiny shoemakers living in the forest called Leprechauns. These mysterious little men are supposed to be rich and hide their gold in black pots found at the end of the rainbow. It is supposed to be good luck when you see a rainbow, so involve your child in making one that not only is a St. Patrick’s Day craft, but one that teaches about the colors of the rainbow. Teach your little learner the name “Roy G. Biv” (red, orange, yellow, green, blue, indigo, violet) and he will never forget the order of colors in a rainbow.
Materials:
  • Sky blue card stock or construction paper
  • Tempera poster paints (red, orange, yellow, green, blue, violet)
  • Black construction paper
  • Shiny pennies
  • Pencil
  • Heavy-duty glue
  • Safety scissors
  • Paper plate

Directions:
Step 1 – Prepare your work area covering the table and floor with newspaper. This craft involves finger printing with paint and can get messy. You may even want your child to wear a paint smock to protect her clothing.

Step 2 – Place a dollop of paint (one of each color) onto a paper plate to look like an artist’s pallet.

Step 3 – Draw an arch on the sky blue paper large enough for a rainbow that covers two-thirds of the page.

Step 4 – Invite your child to use his pointer finger or thumb to do the printing. First, dip into the red paint and make fingerprints along the lines of the arch. Wash that finger with soap and water and then proceed with the next color that is orange. Continue this procedure one row after the other with yellow, green, blue, and violet paint until the rainbow is completed.

Step 5 – While the paint is drying, cut out a pot shape from black construction paper. Parents may need to draw the pot and the child can cut this out using safety scissors.

Step 6 – Glue the pot shape on the sky blue paper at the foot of the rainbow.

Step 7 – Search for shiny pennies and glue a few on the black pot. You will need to use very heavy-duty glue or a low-temperature glue gun to adhere the pennies.

During this craft session talk with your child about how and why rainbows appear in the sky adding a little science to this art project. A rainbow is a circular arc of colors that appears up in the sky when raindrops are illuminated by the sun.

Then tell the fictional, but symbolic story about the leprechauns and their gold. Storybooks are helpful with this task. Legend says if a leprechaun likes you, he will share this gold and other stories say you must catch the leprechaun for him to lead you to his fortune. ‘Tis the luck of the Irish – Happy St. Patrick’s Day!

Until next time,
Tania


Photo courtesy of Tania Cowling, all rights reserved
Permission needed to reprint this blog


Wednesday, October 2, 2019

Halloween Projects to Craft With Your Kids


Let's get crafting for the upcoming Halloween holiday. Here are some published clips I wrote a while back for your viewing. Crafts and instructions are included per article.
  • Decorate your room or use these ideas for make and take projects. The materials are probably in your art closet or easy to find. So let’s get started on these “boo-tiful" crafts.

  • Your children (and students) will love to make these theme projects for Halloween. Ghosts do not have to be scary (especially for young children) – make them a friendly part of this holiday season.  Click Here

  • How about some awesome monsters using paint chip pages that you can obtain free at your favorite paint store.  Click Here

Have a great week. I'll be posting more "spook-tacular" projects soon!

Happy Parenting,
Tania

Thursday, May 31, 2018

Diploma Craft for Your Little Graduate


Whether your child is graduating from preschool or kindergarten, it’s time for big dreams and next steps. A diploma is the official certificate that your youngster has made it to the next level of education – it’s a notable memory. This craft is not a true diploma, but a chance for your little graduate to draw and color a self-portrait and present it in diploma style. There are a couple ways to create this project, so choose your art mediums and let’s get started.
Materials:
  • White copy paper
  • Crayons, markers, or watercolors
  • Thin ribbon
  • Computer (optional)
  • Paintbrush (optional)

Directions:
Step 1 – This craft is not really messy, but you may want to cover your tabletop with newspaper. Young children sometimes color outside the lines and may mark your table on accident.
Step 2 – On a clean sheet of white copy paper your child will color a picture of a graduate. This can be a printed black line copy made with your computer or a self-portrait created by your child.  There are websites that offer coloring pages for graduation (see below). These are only two of the many coloring pages sites you can find online.  For a more creative project, have your kiddo draw and color a self-portrait of him or her on graduation day, wearing a gown and mortarboard graduation cap.
Step 3 – Invite the child to use crayons, markers, or even paint with watercolors. Let this page dry thoroughly before the next step.
Step 4 – Carefully roll the paper into a small circular tube.
Step 5 – Tie the diploma roll with a length of thin ribbon. Any color is acceptable, or you could use the shade that coordinates with your school’s colors.
Step 6 – Role-play and present this diploma craft to your child in a mock commencement ceremony.
A couple websites with graduate coloring sheets:
Congratulations to your child, Happy Parenting,
Tania  
Photo courtesy of Tania Cowling, all rights reserved

Tuesday, September 26, 2017

Halloween Craft Via Colortime Crafts & Markers


Hello Friends,
I wanted to introduce you to a company who provides the cutest and fun fabric coloring crafts. For Halloween I was provided a cotton tote, just in time for trick-or-treating. The kit contains a preprinted tote, three fabric markers, and an instruction sheet. If your child can color inside the lines, this craft is for you. My family found it easy to make and a “spook-tacular” addition to our Halloween accessories. 


ColortimeCrafts and Markers has kits for all seasons and reasons. Your child can color tee-shirts, bandanas, head wraps, totes, and pillowcases. The markers are easy to use and the fabrics do not have to be prepped before coloring. They are non-toxic and permanent on the fabric, yet will wash off hands easily. The design doesn’t need to be heat set and the colors are chlorine resistant. Just make sure to let the project dry thoroughly before washing (at least two hours). All of these instructions come with your package.

Clean, easy, and affordable crafts activity that doubles as a unique keepsake! For savings, join our "Birthday Club" and receive 20% off and a free backpack, with your order at http://www.colortime.com/

Check out this coupon code for the latest online special offers and promo codes to Colortime Crafts and Markers.


Until next time – Happy Parenting,
Tania

I want to thank Colortime for the opportunity to try their product. I was not paid or coached to write this blog post. The information about the product was provided and these are my own opinions.